这是一篇躺在笔记本里接近两年的技术笔记,今天正好想起了,编搬过来分享一下
这是在学校的时候做日语五十音 APP 的临摹模块中一个技术点,当时也是纠结了一阵子才总结出方法的,遂记录以纪念之~
需求
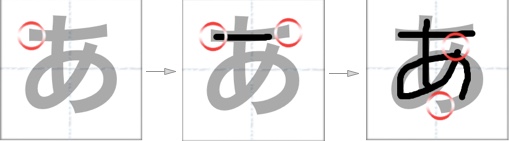
大致需求是要在手机上实现类似传统毛笔字临摹字帖练习的功能,画出暗隐的底文,然后每一划的 起笔点 和 落笔点 给出红圈提示,规定起落在指定红圈区域中,才算正确,并给出下一划的提示,以达到简单的正确性临摹检测。当然,这里只是简单的只识别首尾锚点(红圈),如果要增强正确性检测,可以每一笔多增加几个检测锚点。
预览
原理
- 每个假名最多 4 笔,也就是最多 8 个点
- 开始的时候提示第一个落笔点,触摸后提示第二个点,也就是第一笔点结束点,松开后判断两个点是否在范围(圆圈)内,如果都在点话,表示这一笔临摹大致正确,取消第一笔点这两个提示圈,然后就开始第二笔,如此循环…
- 要实现此功能肯定要有一个标志变量来保存进度,也就是写到第几笔了,不然写到后面会干涉前面已经正确的笔画。
- 还需要事先录入所有需要临摹的字符检验点坐标集合,当时另外做了一个小工具,用于自动生成 点 / 松 坐标并输出至文件以便程序读取 (如果手动取点每个字符也太折腾了)
实现
- 用的【ACEDrawingView】来作临摹板,稍作修改,添加两个协议函数来返回出开始触摸的坐标和起指(抬起)的坐标。 把所有的点保存到一个数组,对应每个点的提示圆圈也保存到另一个数组。
- 一个标识变量(okNumber)存储当前写到第几笔了。
代码
-(void)touchBegan:(CGPoint)point
{
    beganPoint = point;

    if (okNumber == 0) {
        if ([self isInRound:point and:[pointArray[0] CGPointValue] in:kRadius]) {
            [self.drawingView addSubview:roundArray[1]];
        }
    }else if (okNumber == 1)
    {
        if ([self isInRound:point and:[pointArray[2] CGPointValue] in:kRadius]) {
            [self.drawingView addSubview:roundArray[3]];
        }
    }else if (okNumber == 2)
    {
        if ([self isInRound:point and:[pointArray[4] CGPointValue] in:kRadius]) {
            [self.drawingView addSubview:roundArray[5]];
        }
    }
}

-(void)touchEnded:(CGPoint)point
{
    if (okNumber == 0) {
        BOOL b1 = [self isInRound:beganPoint and:[pointArray[0] CGPointValue] in:kRadius];
        BOOL b2 = [self isInRound:point and:[pointArray[1] CGPointValue] in:kRadius];

        if ( b1 && b2 ) {
            okNumber=1;
            [roundArray[0] removeFromSuperview];
            [roundArray[1] removeFromSuperview];
            [self.drawingView addSubview:roundArray[2]];
        }
        else{
            [self.drawingView undoLatestStep];
        }
    }else if (okNumber == 1){
        BOOL b1 = [self isInRound:beganPoint and:[pointArray[2] CGPointValue] in:kRadius];
        BOOL b2 = [self isInRound:point and:[pointArray[3] CGPointValue] in:kRadius];

        if ( b1 && b2 ) {
            okNumber=2;
            [roundArray[2] removeFromSuperview];
            [roundArray[3] removeFromSuperview];
            [self.drawingView addSubview:roundArray[4]];
        }else{
            [self.drawingView undoLatestStep];
        }

    }else if (okNumber == 2){
        BOOL b1 = [self isInRound:beganPoint and:[pointArray[4] CGPointValue] in:kRadius];
        BOOL b2 = [self isInRound:point and:[pointArray[5] CGPointValue] in:kRadius];

        if ( b1 && b2 ) {
            okNumber=3;
            [roundArray[4] removeFromSuperview];
            [roundArray[5] removeFromSuperview];
            self.yinLabel.hidden=YES;
        }else{
            [self.drawingView undoLatestStep];
        }

    }
    else{
        [self.drawingView undoLatestStep];
    }
}
然后做了一下算法优化,用循环实现,更灵活,效率更高,代码更清晰:
-(void)touchBegan:(CGPoint)point
{
    beganPoint = point;

    for (int i=0; i<[pointArray count]/2; i++) {
        if (okNumber == i) {
            if ([self isInRound:point and:[pointArray[i*2] CGPointValue] in:kRadius]) {
                [self.drawingView addSubview:roundArray[i*2+1]];
                return;
            }
        }
    }
}

-(void)touchEnded:(CGPoint)point
{

    for (int i=0; i<[pointArray count]/2; i++) {
        if (okNumber == i) {
            BOOL b1 = [self isInRound:beganPoint and:[pointArray[i*2] CGPointValue] in:kRadius];
            BOOL b2 = [self isInRound:point and:[pointArray[i*2+1] CGPointValue] in:kRadius];

            if ( b1 && b2 ) {
                okNumber++;
                [roundArray[i*2] removeFromSuperview];
                [roundArray[i*2+1] removeFromSuperview];
                if (i+1 != [pointArray count]/2) {
                    [self.drawingView addSubview:roundArray[i*2+2]];
                }

                return;
            }
            else{
                [self.drawingView undoLatestStep];
            }

        }
    }
}